Showing posts with label under painting. Show all posts

Sunday, September 20, 2009

Thompson Lake Again, and More on Grounds


Here is another small painting done the second afternoon I was at Thompson Lake. It is the same scene as the last post but the view is widened to take in more of the shore. Again, it was done on panel primed with clear acrylic gesso tinted with cadmium red.

Since my aim is to do 100 oil paintings as quickly as possible I decided to use up some pieces of bookboard that are about 1/8" thick. Too thick for the books I make but perfect for doing the little paintings. Most are now primed the warm cadmium red. The red is a good ground color since many of the paintings will be landscapes that are predominantly green. Red, the complement of green makes a nice vibration in those spots that are not covered with paint.

Some panels are primed with white acrylic gesso to which I have added a bit of pumice. The white is appealing since a painting can be blocked in with the color (or its complement) of the subject. As a pastel artist I almost always use white Wallis sanded paper. My process is to block in the painting with pastel and then wet it down "melting" the pastel into the paper. You could get the same effect by doing a watercolor underpainting. At any rate, there is something familiar about looking at a fresh, white panel. And the color just seems to sparkle on it. I have been using the same process with the oils by putting down an underpainting of thinned paint.

Other panels have been primed with the clear gesso (untinted), that way I end up with the natural, gray color of the bookboard. Having a medium value gray makes it easy to establish the values in a painting since your eye is not fooled by the stark white of the ground if that is what you are starting with. I tried one painting on this gray panel today. When I get it scanned I'll post it.

Tuesday, September 15, 2009

Painting and Fishing on Thompson Lake

It was a beautiful day to paint. My husband, Eric, and I spent two afternoons at one of his favorite trout lakes last week. Located off the Gunflint Trail in northern Minnesota, Thompson Lake is one of those catch-and-release lakes that is small enough for me to have several good views to choose from. Today the sun was getting low and I turned my easel toward the west.

The sun was streaming in through the trees. A shaft of light was coming through the bushes near the bottom of this painting and the scene just glowed. Next time, if I try this view again in my studio, I'll jack up the yellow in the sun lit areas.


This painting was done on a panel primed with acrylic gesso tined with cadmium red. Most of the red is obliterated except for a some along the top and a tad near the bottom. It would have been better to leave a bit more. I've done about 25 paintings since my worshop in August. The practice helps!

And yes, my husband really does fish while I paint. I took this shot just before I packed up by easel. That speck near the far shore in Eric in his float tube with fly-rod in hand.


Thursday, July 2, 2009

Working from A Photo

Here is an example of an experiment: working from a photo. I can count on one hand the number of times I have tried painting or drawing from a photo. Let's face it--the camera distorts what is "out there." One does not get the feel of the panorama in a photo. I my mind the artist is better able to depict the three dimensionality of the place and put it into a two dimensional format better than the camera. And I have friends who can spot a painting done from a photo in an instant. I would rather work from life. But one day I decided to spend the day on composition issues and did about 50 thumbnail sketches from photos. I was more interested in the composition than anything else that day so I thought photos I'd taken would work.

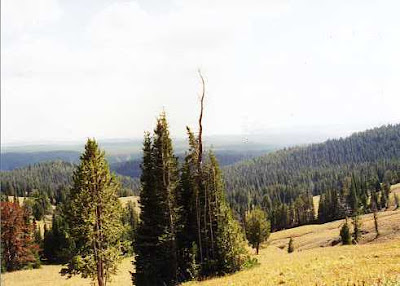
Below are two photos taken in Yellowstone Park followed by six of the thumbnails and then two stages each of two paintings.


1

What interested me was the bright grassy meadow against the dark trees.


2

This second photo shows continuation of the panorama--just some visual information but nothing that "grabbed" me.

Thumbnails
The question was where to crop the image. I ended up trying two options. First the upper left thumbnail, below, and then the thumbnail on the right.

More thumbnails

Using the first thumbnail I did a color study to see if I could work out capturing the feel of the day. Unfortunately I had not make a sketch of the scene and relied on the camera. For me a sketch has a lot more information than a photo. I have been able to develop paintings from sketches even without color notes. In a sketch your eye and hand do the editing and you get to the essence of what attracted you to the scene in the first place. And conveying that idea is what I want my painting to be about.
Below is stage 1 done on ColorFix sanded paper.


Stage 1

In stage 2, below, additional layers of pastel help push back the hills in the distance and give a little more shape to the grassy meadow.

Stage 2

The format was not working for me so I started a quick study on mat board coated with a few layers of transparent gesso. I like the texture of the brush marks and the gessoed surface allows me to wet the surface down after I lay in my first layer of pastel. You can see a bit of the underpainting where I have put down warm colors where the sun hits and cooler colors in the shady areas.
Stage 1 below.


Stage 1

Stage 2 of this study starts to tone down the intense yellows, give a bit of form to the trees and begin to soften up the distant hills.


Stage 2

The next several stages are yet to come. Time to put these studies away and return to them with fresh eyes.


Saturday, June 13, 2009

Using Art Materials

Stage 1


Stage 2

In a recent pastel class I taught I gave the class several pieces of an interesting (that means I don't know what kind it actually was) brown paper that my friend Roz Stendahl had passed off to me. The color and texture was much like the brown kraft paper you find in grocery bags but with a little more tooth. The paper came from Wet Paint in St. Paul in a 9x12" tablet. Though not archival, it is fun to work on and I'm going to try to find some more.

As an experiment I tested how it pastel would work on it quickly blocking in the main masses I see of the scene outside my studio window (Stage 1, above). The next test was to see how well the paper took another layer of pastel. I gave the painting a spray with Krylon workable fixative and started in again. The pastel took remarkably well (Stage 2 above).

Another spray of fixative and I worked more on the piece as my cousin Leslie looked on. Too much talking--I forgot to take a photo of the next stages. I gave the painting to one of the students so I can't show you the result but suffice it to say, the paper kept on receiving pastel although with less enthusiasm.

The most fun of this paper was the abandon with which the students used it in class. I handed out several sheets to each one and suggested they just go-for-it. After all, it was free paper and they could experiment without the concern that they are going to "ruin" "perfectly good" art materials.

Which brings me to the point of this post: Work often and try to forget the cost of the art materials you use. Your time is your most precious commodity. Yes, art materials are often expensive, but the way to become the artist you want to be is to use those materials--the more the better. Be confident that the Universe will find a way for you and, maybe, some free art materials along the way. Works for me.